Architectural drawings change throughout design, coordination, permitting, bidding, and construction. The challenge is not simply editing the CAD geometry. A reliable revision workflow must also show what changed, identify which sheets were affected, preserve the previous issue, and communicate the update consistently across the drawing set.
The exact documentation required for a project depends on office procedures, contracts, reviewing authorities, and the purpose of the issue. However, the underlying CAD workflow is similar: separate active drafting from issued records, make controlled edits, mark revisions clearly, and check every related view before publishing the next set.
Working changes and issued revisions are not the same
During design, a floor plan may change many times before it is formally issued. These working changes are part of normal drafting and do not necessarily need revision clouds or entries in a sheet revision block.
An issued revision is different. It modifies information that was previously transmitted as part of a defined drawing issue. Once a set has been issued, teams generally need a record that connects the change to an issue date, description, and affected sheets.
- Working change: An edit made within the current design process before a controlled issue.
- Issued revision: A documented change to information that has already been formally distributed.
- Sheet reissue: A new publication of an affected sheet, usually with updated issue or revision information.
- Record copy: A preserved version of the files or published sheets representing a particular issue.
Keeping these concepts separate prevents a revision record from becoming crowded with routine drafting activity.
Establish an issue baseline before editing
A revision can only be understood in relation to an earlier issue. Before changing issued drawings, preserve the baseline that recipients previously received. Depending on the project workflow, this may include published sheets, drawing files, referenced files, plot settings, and an issue register.
Do not rely on a single active DWG file as the only historical record. Once geometry has been overwritten, it can be difficult to reconstruct exactly what appeared in the earlier issue. File backups are useful, but a deliberately archived issue is easier to identify than an undifferentiated collection of automatic saves.
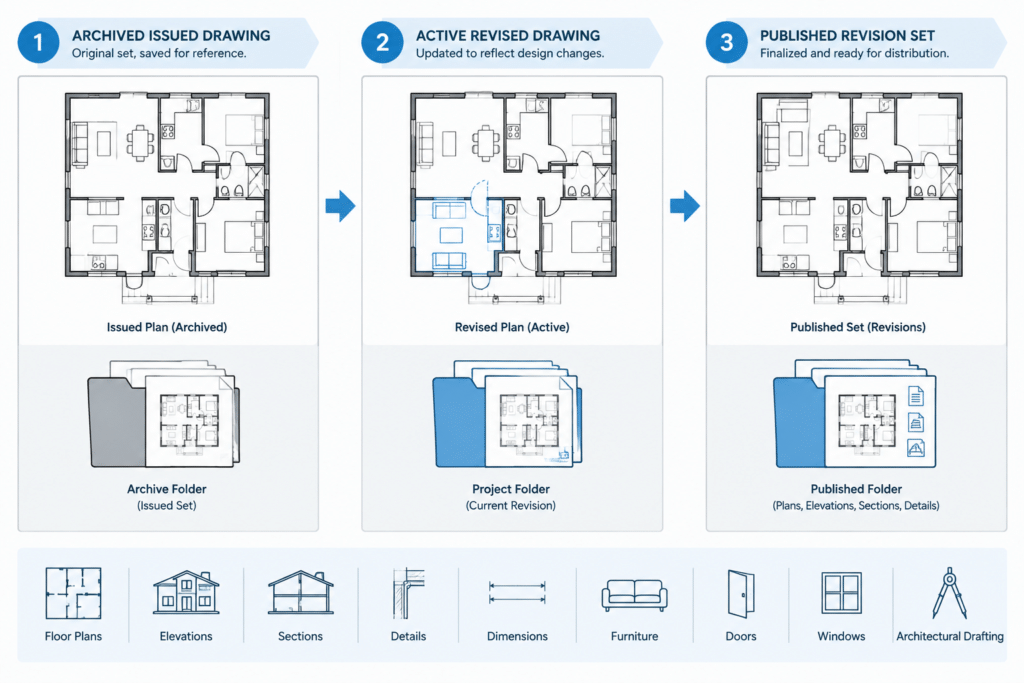
Information worth recording for each issue
- Issue purpose or description
- Issue date
- Sheets included in the issue
- Revision identifier used on each affected sheet
- Published file location
- Relevant transmittal or distribution record
Use a naming convention that distinguishes active files from archived issues. Avoid informal filenames such as “final,” “final-new,” or “latest,” because those labels quickly lose meaning.
Use revision identifiers consistently
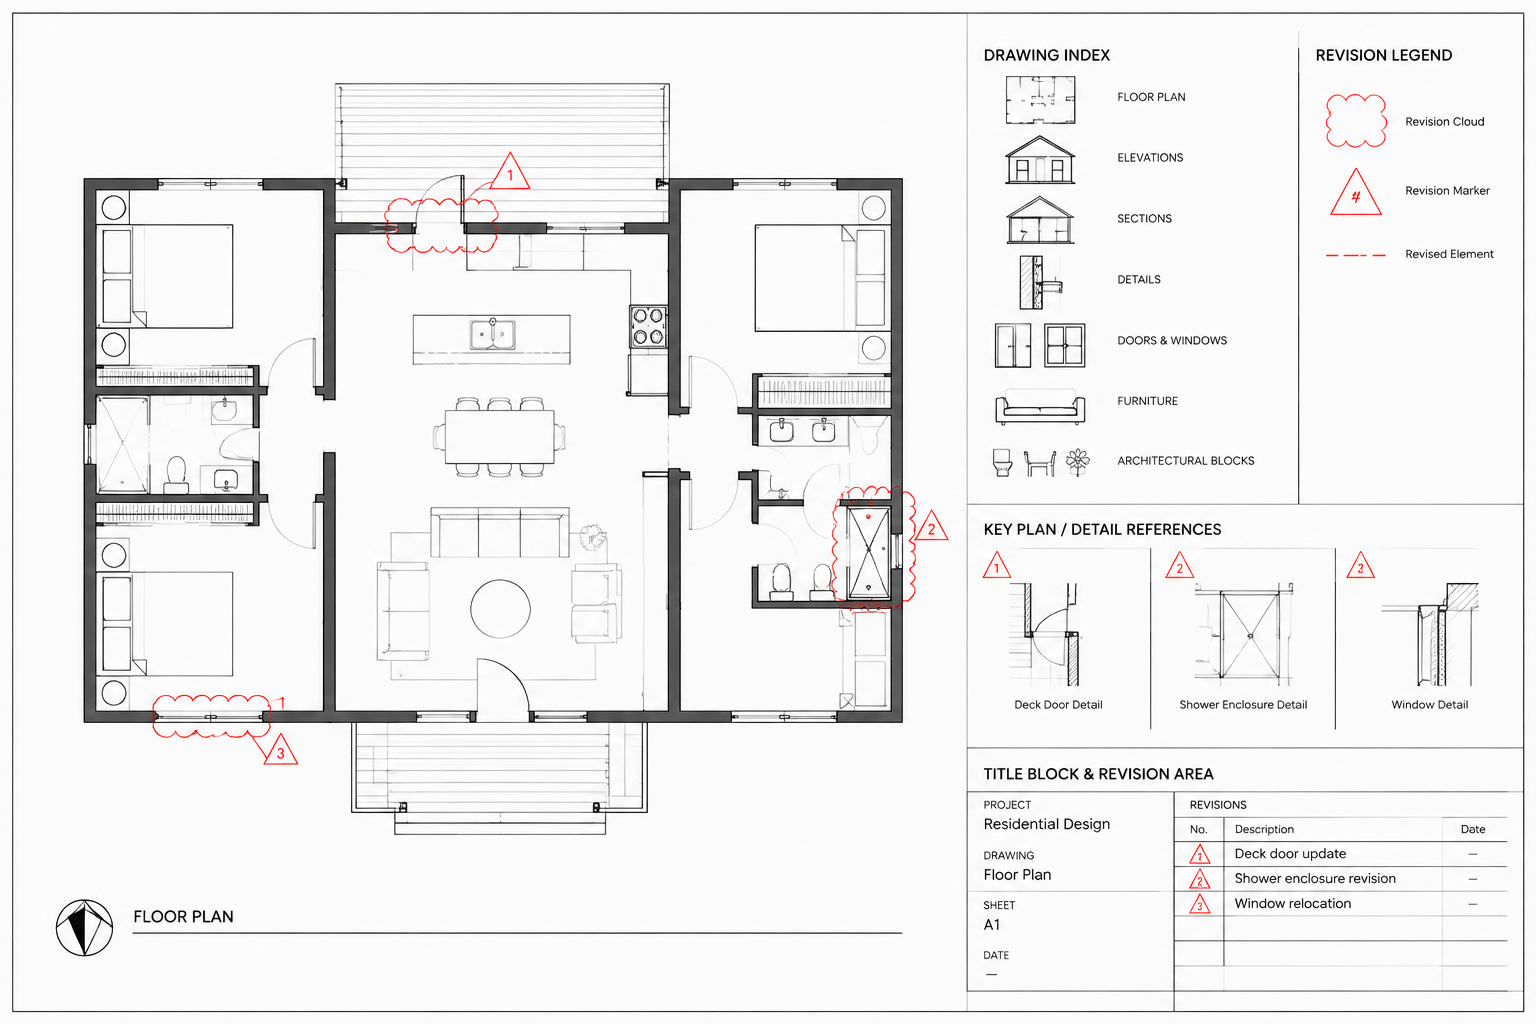
A revision identifier connects several pieces of information: the changed area on the drawing, the revision entry in the title block, and the project issue record. It may use letters, numbers, or another office-defined sequence. The important point is that the same identifier must refer to the same revision wherever it appears.
Do not assume that every sheet shares an identical revision history. A sheet that was not changed may not carry the same revision entry as an affected sheet, depending on the project’s documentation procedure. The drawing index or issue matrix should make the sheet-by-sheet status understandable.
| Location | Purpose | Coordination check |
|---|---|---|
| Revision cloud | Shows the approximate changed area | Cloud surrounds the intended edit without hiding information |
| Revision marker | Connects the cloud to a revision identifier | Identifier matches the title block entry |
| Sheet revision block | Records the sheet’s revision history | Date and description match the issue record |
| Drawing index | Summarizes sheet status within the set | Affected sheets are identified correctly |
| Issue archive | Preserves what was distributed | Published files are complete and readable |
Organize revision graphics in the CAD file
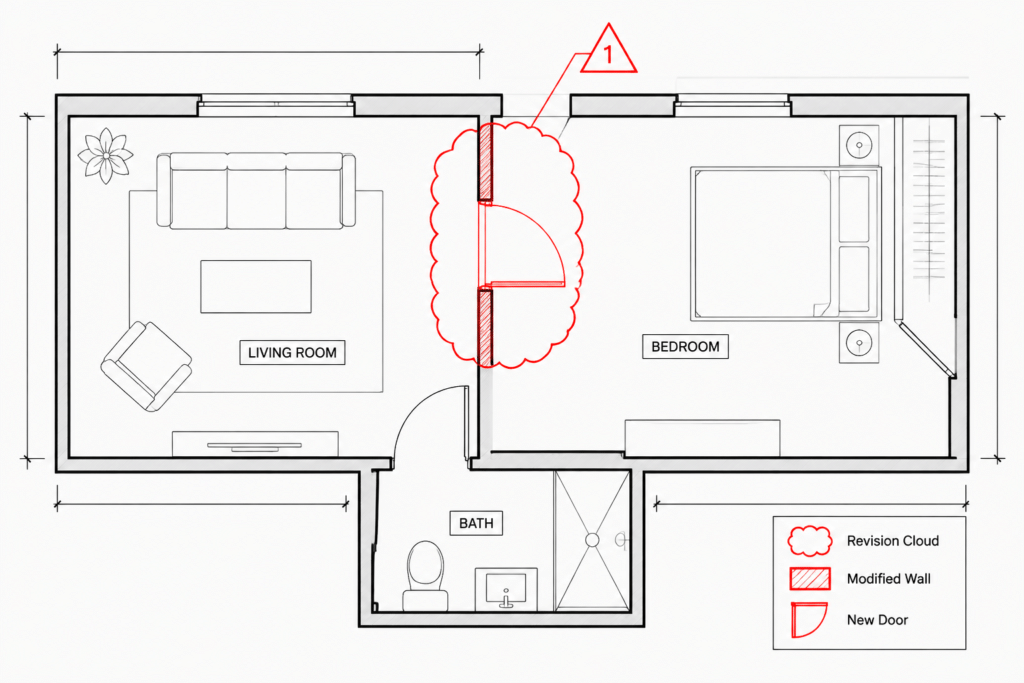
Revision clouds and markers should be easy to display, plot, review, and remove when they are no longer needed. Place revision graphics on dedicated layers rather than combining them with walls, dimensions, notes, or other permanent drawing content.
A project may use one general revision layer or separate layers for individual revisions. Separate layers can make it easier to isolate a current issue while retaining earlier graphics temporarily. A general layer is simpler but requires careful object management. Choose the method that matches the project’s file structure and publishing process.
Keep revision graphics in the appropriate space
If a cloud identifies a model-space change that appears in several views, consider how it will behave in each viewport. A cloud drawn directly over model geometry may appear where it is not intended. Paper-space revision graphics can provide sheet-specific control, especially when the same referenced model appears on multiple sheets.
Whichever method is used, avoid mixing model-space and paper-space clouds without a clear rule. Reviewers should be able to determine where revision graphics belong and how they will plot.
Draw clear revision clouds and markers
A revision cloud should direct attention to the change without covering dimensions, notes, symbols, or critical geometry. Enclose the affected region as narrowly as practical while still giving the reader enough context to find the edit.
- Do not cloud an entire floor plan when only one doorway changed.
- Avoid cloud arcs that are so small or dense that they become visual noise.
- Keep the marker visible and close enough to establish a clear relationship.
- Check that clouds remain legible at the plotted sheet scale.
- Use multiple clouds when separate changes are too far apart to communicate clearly as one area.
A cloud identifies where to look; it does not explain the complete technical meaning of the change. Revised dimensions, notes, tags, and details must still communicate the updated design.
Coordinate every view affected by the change
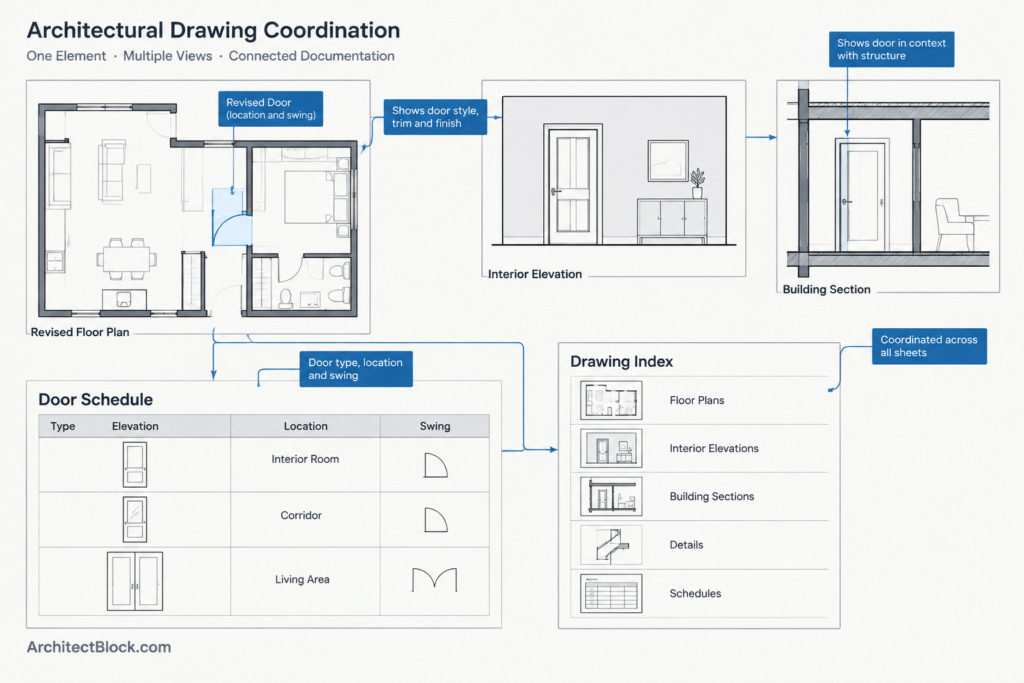
One of the most common revision errors is updating the plan while leaving related elevations, sections, schedules, and details unchanged. Before editing, identify the full drawing relationship around the affected element.
For example, moving a door may affect the floor plan, dimensions, door tag, door schedule, interior elevation, reflected ceiling plan, finish information, and enlarged plan. Changing a partition may also alter room areas, room tags, ceiling boundaries, casework, and referenced details.
Use a change-impact checklist
- Base floor plan and dependent plan views
- Exterior and interior elevations
- Building and wall sections
- Enlarged plans and details
- Door, window, finish, or equipment schedules
- Dimensions, room tags, keynotes, and callouts
- Consultant backgrounds and referenced files
- Drawing index and sheet issue information
External references can improve coordination because a corrected base drawing may update multiple sheets. They can also spread an unintended edit across the set. After reloading references, inspect every sheet that displays the changed file rather than checking only the sheet where the edit originated.
Write useful revision descriptions
A revision description should help a reader understand the general scope of the issue. Descriptions such as “changes” or “updated drawings” provide little value. At the same time, the revision block is not the place for a long technical narrative.
Use a concise description that identifies the affected subject or area, such as a plan coordination update, revised opening layout, or modified room configuration. If a formal directive, response, or change document governs the work, reference it according to the project’s established procedure rather than inventing an informal label.
Run a pre-issue revision review
Before publishing, compare the revised set with the archived baseline. A visual comparison, overlay, or controlled file-comparison process can reveal shifted geometry, missing annotations, viewport changes, and unrelated edits. Automated comparison tools can help, but they do not replace drawing review because they may highlight drafting cleanup that has no design significance.
- Confirm each cloud surrounds an actual issued change.
- Verify every marker against the sheet revision block.
- Check dates and descriptions across the index and affected sheets.
- Inspect referenced drawings after reload.
- Plot or publish a test set and review it at intended sheet size.
- Remove temporary notes, construction lines, and review markups.
- Archive the completed issue separately from active production files.
Handle superseded revision graphics deliberately
Older revision clouds should not remain visible indefinitely by accident. Depending on the project procedure, they may be removed, hidden, or retained for a defined purpose when a later issue is prepared. Historical revision entries may remain in the title block even when their clouds are no longer shown.
Do not erase revision history without confirming the required documentation process. Conversely, do not leave multiple generations of clouds visible if they make the current change impossible to distinguish. The goal is a clear current issue supported by a reliable archive.
A revision workflow is also a coordination workflow
Revision management is more than drawing clouds around edited objects. It connects CAD production, sheet organization, quality control, and project communication. A strong workflow preserves the previous issue, controls the active edit, checks related views, and publishes a coordinated record.
Revision symbols and title block entries document changes; they do not verify design compliance or technical suitability. The responsible project team must still review the revised work against applicable project requirements, consultant information, contracts, and governing regulations.