A reliable room finish plan connects graphic locations in the CAD drawing with written information in the finish schedule. This guide explains how to organize that relationship so finish extents, transitions, room identifiers, tags, and exceptions can be reviewed as a coordinated documentation system.
The workflow is applicable to architectural and interior drawing sets, whether finishes are documented on a dedicated plan or incorporated into another coordinated sheet. Project conventions should always govern the final layer names, symbols, code structure, and division of information between plans, schedules, elevations, and details.
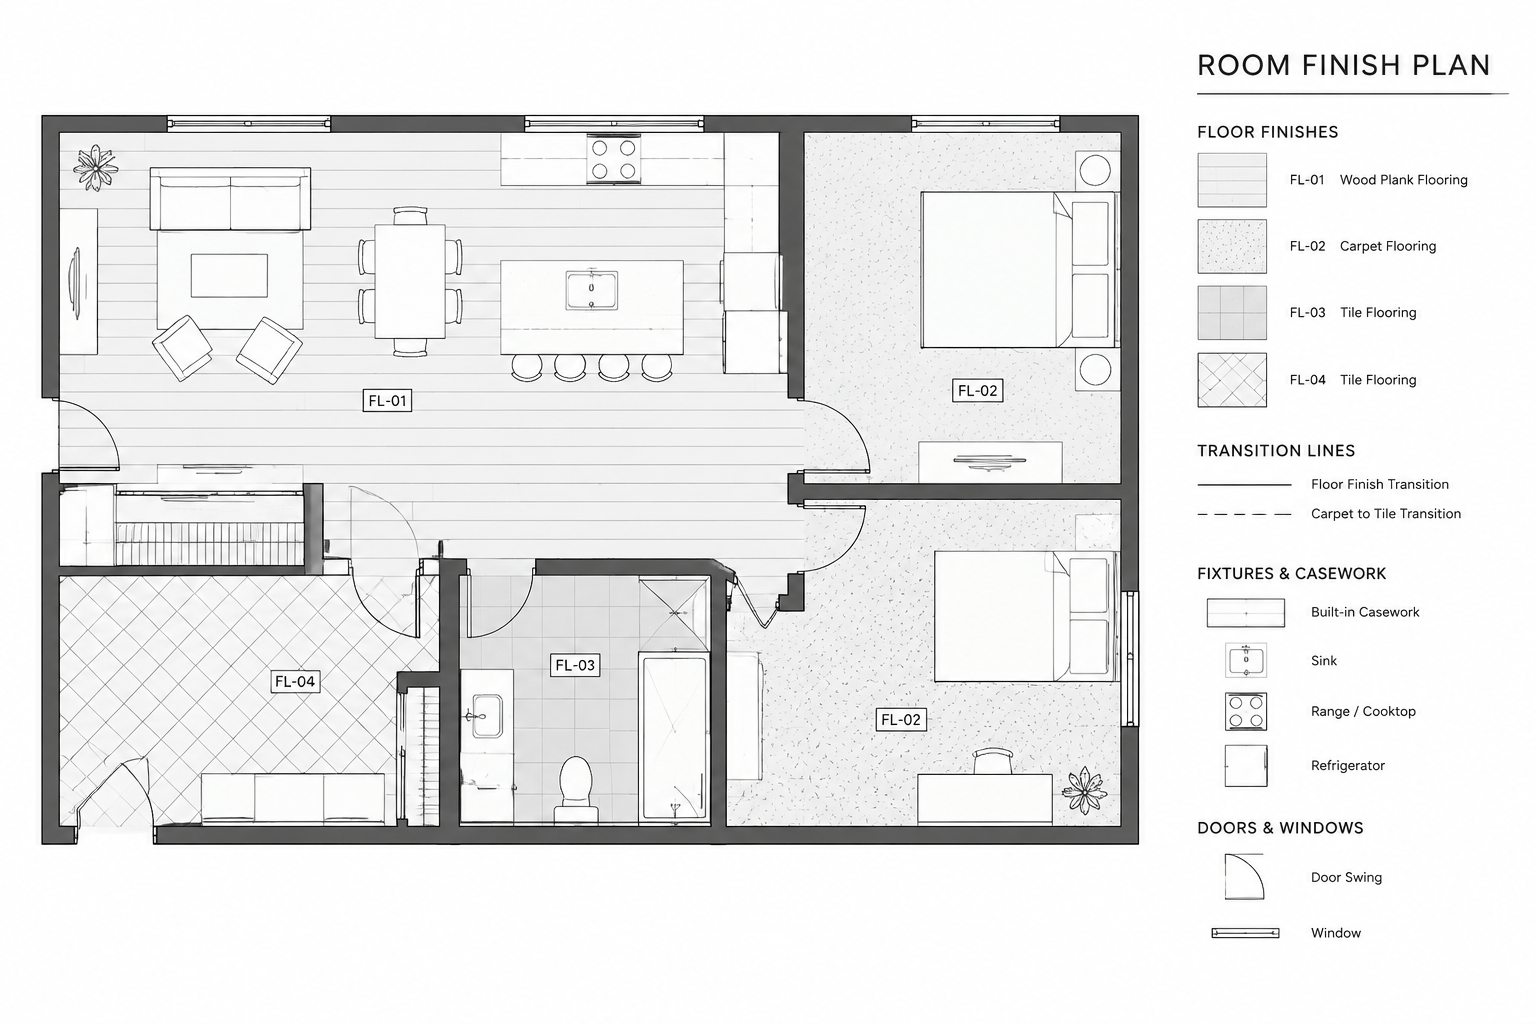
A room finish plan communicates where architectural finishes occur and how they relate to rooms, doors, walls, casework, and other building elements. Depending on the project, it may document flooring alone or coordinate floor, base, wall, and ceiling finishes with a room finish schedule.
The drawing should do more than fill rooms with hatch patterns. A useful finish plan identifies changes within rooms, explains transitions, and gives the schedule enough location information to be interpreted correctly. The drafting process therefore depends on consistent room data, controlled graphics, and careful coordination with the architectural plans.
What a room finish plan should communicate
The exact scope varies by project. Some drawing sets use a dedicated finish floor plan, while others show finish information on an enlarged plan or interior design sheet. A room finish plan may communicate:
- Floor finish extents and changes in material
- Finish transitions at doors or open connections
- Base finish types and exceptions
- Wall finish locations, including accent surfaces
- Room finish tags linked to a schedule
- Finish direction, alignment, or pattern origin when relevant
- Special notes for borders, insets, thresholds, or feature areas
Not every finish needs to be drawn with the same method. A uniform floor material may be identified by a room tag, while a floor with several materials usually requires visible boundaries and separate labels. Wall finishes may be easier to describe with keyed notes, directional symbols, or wall-specific tags than with dense plan hatching.
Begin with a coordinated architectural background
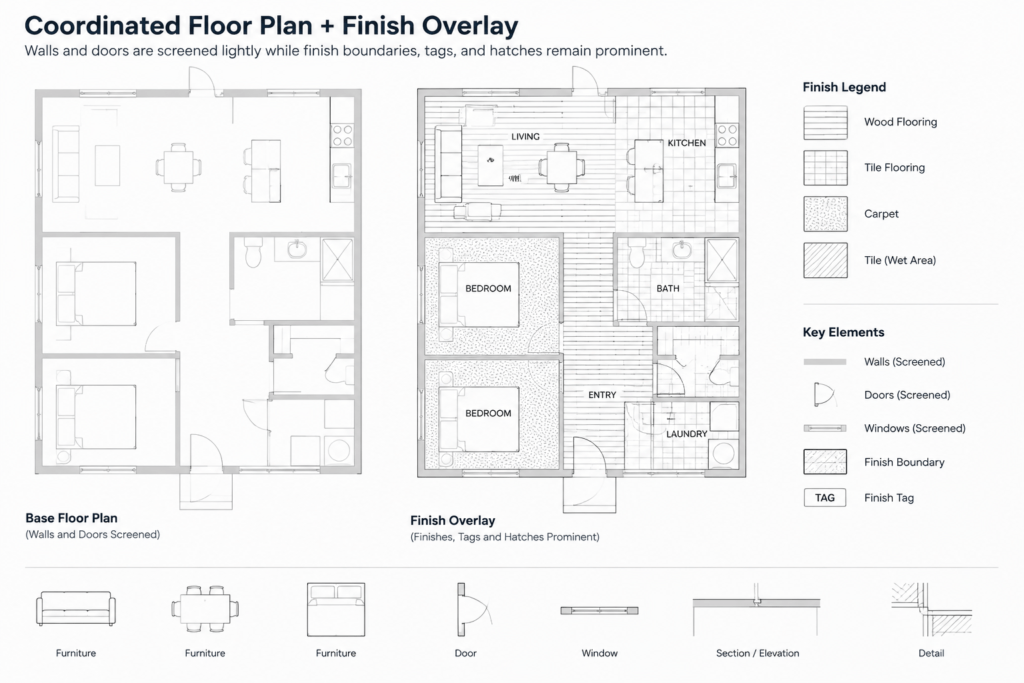
Use the current architectural floor plan as the background for the finish drawing. The plan should already contain coordinated walls, openings, room boundaries, fixed casework, plumbing fixtures, and major built-in elements. If the project uses external references, keep the finish annotation in its own drawing rather than editing the referenced architectural plan.
Before adding finish information, review the background for conditions that affect material extents. These include wall recesses, columns, alcoves, islands, floor-mounted equipment, millwork, and changes between enclosed rooms and open circulation areas. A finish boundary based only on the room name may miss these local conditions.
Reduce the visual prominence of background elements so finish information remains easy to read. Walls and major architectural edges should still provide orientation, but furniture and secondary equipment should not compete with finish tags and transition lines.
Establish a finish coding system before drafting
Agree on the relationship between plan labels, material specifications, and the finish schedule before placing many tags. A short finish code is useful only when it remains consistent across the drawing set.
| Information type | Common drawing method | Coordination concern |
|---|---|---|
| Room-wide floor finish | Room tag or finish symbol | Confirm the finish applies to the complete room |
| Multiple floor finishes | Boundaries, hatches, and individual tags | Locate every transition clearly |
| Base finish | Schedule entry or local keynote | Identify walls where the typical base does not apply |
| Wall finish | Schedule entry, wall tag, or directional note | Distinguish individual walls and partial-height areas |
| Ceiling finish | Finish schedule or reflected ceiling plan reference | Avoid conflicting information between plans |
Codes should be unique and readable without relying on hatch appearance. Similar materials may plot with nearly identical tones, and users may view the drawing without color. The written code remains the primary identifier; hatching is a supporting graphic.
Organize finish information on dedicated CAD layers
Separate finish content by function so it can be edited and displayed without disturbing the background plan. A project may use distinct layers for finish boundaries, hatches, tags, transition symbols, notes, and overhead references. Follow the office or project layer system rather than creating unrelated naming conventions inside one sheet.
Keeping boundaries separate from hatches is especially helpful. The boundary line may need to remain visible while a hatch is screened, hidden, or replaced. Tags should also remain independent so they can be repositioned without rebuilding the graphic pattern.
Draw floor finish boundaries intentionally
Use closed, clean boundaries for areas that receive different floor finishes. Trace the actual exposed floor area rather than simply outlining the room walls. Consider casework, raised platforms, floor openings, fixed bases, and other elements that interrupt the finish.
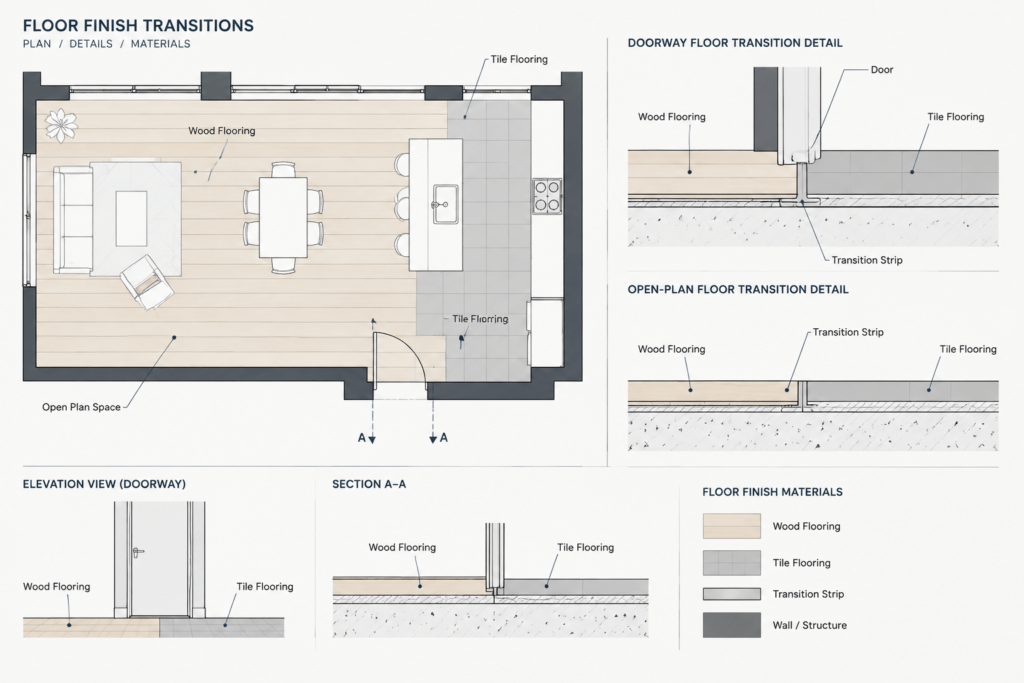
Where adjacent materials meet, place the transition line at a location that can be understood and constructed. Door openings require particular attention. The plan should make clear whether the change aligns with a door, frame, wall face, or another defined architectural edge. Do not assume the contractor will infer an intended transition from two nearby hatch patterns.
For open-plan spaces, use architectural features to establish logical finish zones. A change may align with a partition, ceiling feature, counter edge, column line, or other coordinated element. If no physical feature defines the change, provide dimensions or another explicit locating method appropriate to the project documentation.
Use hatches as graphic aids, not as the specification
Hatches can distinguish finish zones and indicate general material character, but they should not be treated as a complete description of the product or installation. A tile-like grid, for example, does not automatically establish exact module size, joint layout, or installation requirements.
Choose patterns that remain legible at the plotted sheet scale. Overly dense patterns can obscure walls, tags, and door swings, while very large patterns can make small spaces difficult to interpret. Review the plotted result rather than judging only from a close model-space view.
When pattern direction matters, include a direction symbol, start-point note, or clearly coordinated layout graphic. Avoid implying a precise installation layout when the drawing is intended only to identify material extent.
Place finish tags for fast plan reading
Position each finish tag within or immediately beside the area it identifies. Use leaders when the tag could be associated with more than one zone. In small rooms, place the tag in a clear adjacent area and point to the finish boundary rather than crowding fixtures and dimensions.
A finish tag may identify only the floor material, or it may combine floor, base, wall, and ceiling references. Whichever method is selected, use it consistently. Avoid mixing full room-finish tags and floor-only tags without a clear graphic distinction.
Repeat a tag when a finish area is interrupted or when one label would require the reader to make an uncertain connection. Repetition is usually preferable to ambiguity, provided all repeated labels remain coordinated.
Document wall finishes and exceptions carefully
Room schedules are efficient for typical wall finishes, but they may not explain accent walls, wet-area finishes, wall protection, backsplashes, or partial-height applications. Show these exceptions with a plan symbol, keyed note, interior elevation reference, or other project-specific method.
Directional wall tags should point to a specific wall face. At corners, confirm that the symbol cannot be read as applying to both walls. If a wall finish stops at a casework edge, opening, or change in height, coordinate the limit with an interior elevation or detail where needed.
Do not duplicate detailed elevation information unnecessarily. The finish plan should locate the condition; the interior elevation can explain its vertical extent and relationship to mounted elements.
Coordinate the plan with the room finish schedule
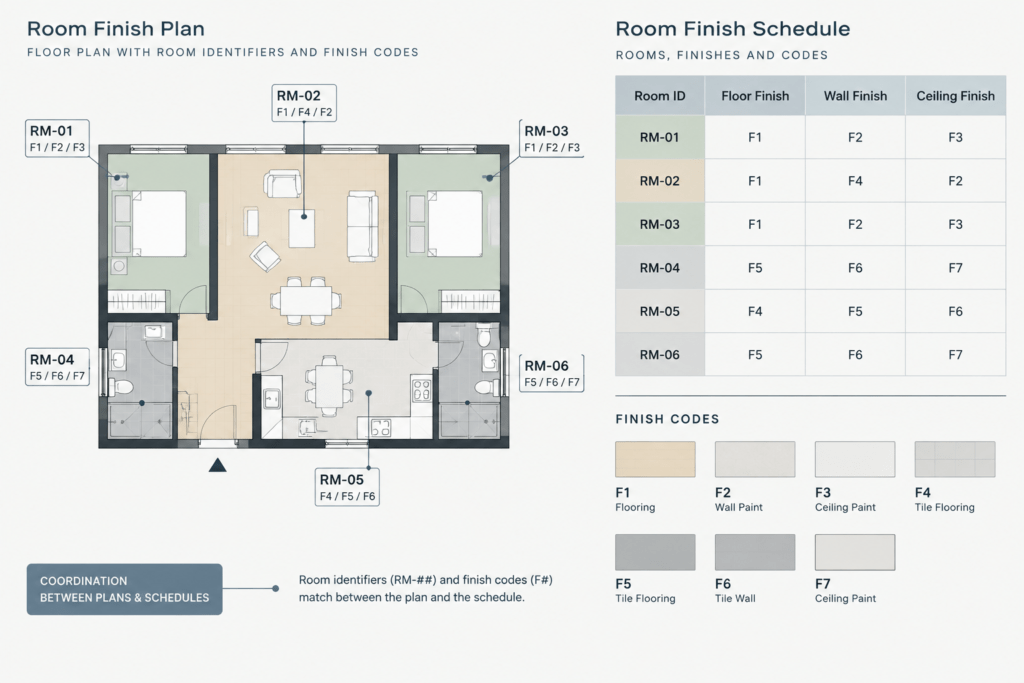
The finish plan and schedule should function as one information system. Room names and room identifiers must match the architectural plan. Finish codes shown graphically must exist in the schedule or finish legend, and scheduled materials must have a clear location.
Check for common coordination failures:
- A room appears on the plan but not in the schedule
- The schedule lists a finish code that is not defined
- A room has multiple floor finishes but only one scheduled entry
- An accent wall is scheduled without identifying which wall receives it
- A finish transition conflicts with a door or casework location
- The ceiling finish differs between the finish schedule and reflected ceiling plan
- Renamed or renumbered rooms retain outdated finish tags
When a room contains several finishes, the schedule can direct the reader to the plan rather than forcing complex location descriptions into a narrow cell. Conversely, the plan can use concise codes while the schedule provides the full material description.
Run a final CAD and drawing review
Before issuing the sheet, inspect both the CAD file and a plotted output. Confirm that hatch boundaries are closed, duplicate patterns are removed, and transition lines are not hidden behind other objects. Check that annotation is readable at the intended sheet scale and that screened background elements remain visible enough for orientation.
Review each room systematically. Start at one area of the plan and compare the room identifier, finish tag, boundaries, notes, and schedule entry before moving to the next space. Then review shared edges between rooms, because transitions are often missed when rooms are checked individually.
Finally, compare the finish plan with interior elevations, reflected ceiling plans, door information, enlarged plans, and relevant details. A well-drafted room finish plan is not an isolated decorative diagram. It is a coordinated architectural drawing that gives each finish a clear identity, extent, and relationship to the building.
A practical method for managing finish-plan revisions
Finish drawings often change after room names, partitions, doors, casework, or material selections have already been documented. Treat each revision as a coordination task rather than as an isolated graphic edit. Moving a boundary may affect its tag, a transition note, the room schedule, an elevation, and the way the adjoining room is described.
Use the room identifier as the primary coordination key whenever the project documentation supports that approach. The room name helps readers understand the space, but the identifier provides a more dependable reference when names are edited during design. If an identifier changes, search the finish plan, schedule, enlarged plans, elevations, and related notes for outdated references.
Separate typical conditions from exceptions
A clear documentation system establishes a typical finish condition and then identifies departures from it. Exceptions may include an accent surface, a localized floor inset, a different base at casework, or a material change within an open area. These conditions should be located graphically instead of being buried in a general room description.
When information appears in more than one drawing, decide which document controls the location and which provides the description. For example, the plan can establish the horizontal extent of a finish while an elevation communicates its vertical extent. This avoids competing graphics that may become inconsistent during revisions.
Review the drawing from the reader’s perspective
During quality control, temporarily approach the sheet without relying on design-team knowledge. Confirm that each code can be traced to a definition, each unusual finish can be located, and each transition can be associated with a recognizable architectural element. If the intended condition is understandable only because the drafter remembers the design decision, the sheet needs clearer documentation.
Also review the plan in its issued visual state. Layer color, hatch appearance, and model-space clarity do not guarantee readable output. Check line hierarchy, tag separation, leader endpoints, background screening, and the distinction between material boundaries and architectural edges in the plotted sheet.
Use a repeatable coordination sequence
- Verify room data: Compare room identifiers and names with the current architectural background.
- Trace finish extents: Confirm that boundaries respond to walls, openings, fixed elements, and open connections.
- Check transitions: Make sure each material change has an unambiguous location.
- Audit codes: Confirm that every plan code has a matching schedule or legend definition.
- Review exceptions: Locate accent surfaces, insets, borders, and other non-typical conditions.
- Compare related views: Check elevations, ceiling information, enlarged plans, and details for conflicting finish information.
- Inspect output: Review the plotted sheet for legibility and graphic hierarchy.
Room finish plan FAQ
What is the difference between a finish plan and a room finish schedule?
The plan shows where finishes occur and how their limits relate to architectural elements. The schedule organizes finish information by room or identifier and provides written material references. They should be coordinated rather than treated as independent documents.
Should every finish be shown with a hatch?
No. Hatching is useful for distinguishing areas, but it can make a drawing difficult to read when overused. A room-wide finish may be communicated with a tag, while multiple materials or irregular extents usually benefit from visible boundaries and separate labels.
Where should a floor finish transition be shown at a doorway?
The transition should be tied to a clearly identifiable architectural edge or documented with another explicit locating method. The appropriate location depends on the door, frame, wall, finish assembly, and project intent, so it should not be left to hatch appearance alone.
How should an accent wall be identified?
Use a directional wall tag, keyed note, elevation reference, or another consistent project convention. The symbol should point to the intended wall face and should not be ambiguous at corners or openings.
Can the room finish schedule replace a finish plan?
A schedule may be sufficient for simple rooms with uniform finishes, but it cannot clearly locate complex transitions, feature areas, or wall-specific exceptions. The required documentation method depends on the complexity of the finish layout and the conventions of the drawing set.
How can finish hatches remain readable in CAD?
Keep hatches on controlled layers, use closed boundaries, avoid patterns that overpower annotation, and evaluate the actual plotted result. Written finish codes should remain understandable even when patterns reproduce with similar tones.
What should be checked after an architectural plan changes?
Review room identifiers, finish boundaries, door transitions, wall tags, fixed casework, schedule entries, elevations, and related notes. A background change can affect both the graphic extent of a finish and its written description.