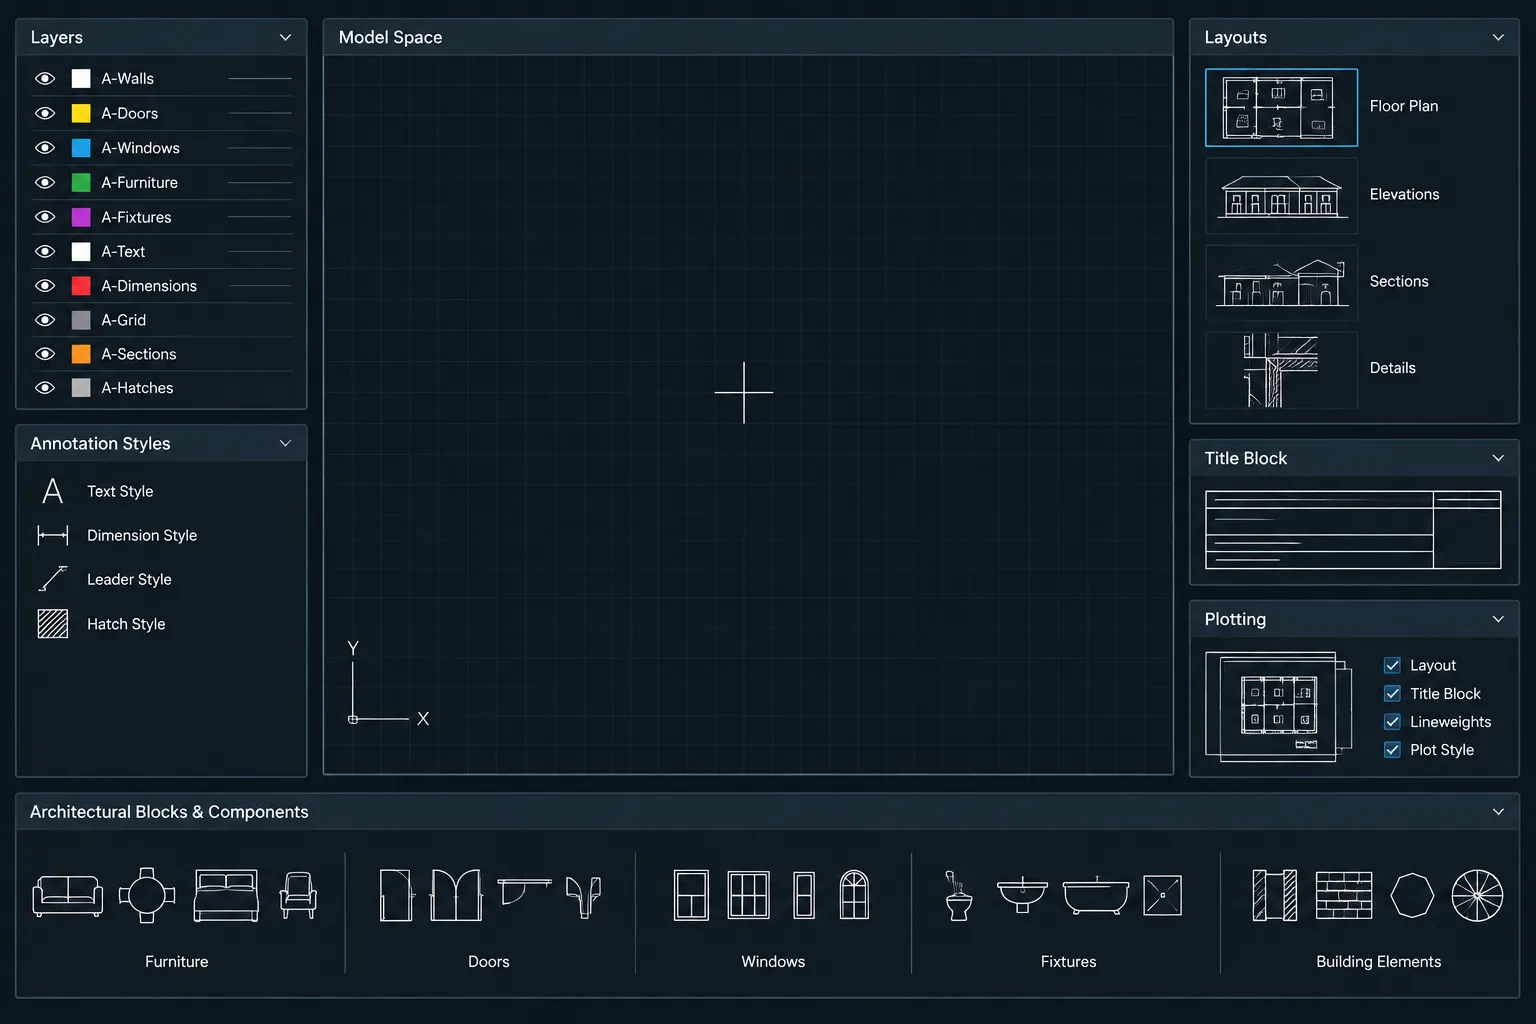
An architectural CAD template is both a production tool and a compact expression of office drafting standards. Its value comes from making repeated decisions consistent while leaving project-specific information out of the starting file.
This guide explains how to organize, test, release, and maintain a template for architectural drawing production. It focuses on the relationships among layers, annotation, layouts, title blocks, page setups, plot styles, reusable content, and quality control rather than treating each setting as an isolated item.
Use the template as a controlled baseline, not as a substitute for project setup. Every new job still requires review of its units, coordinates, sheet requirements, consultant workflow, output method, and applicable regulations.
An architectural CAD template gives every new drawing a controlled starting point. Instead of rebuilding layers, annotation styles, layouts, and plotting settings for each file, a project team can begin with an organized environment that already reflects its drafting workflow.
A useful template is not a sample project filled with leftover geometry. It is a carefully maintained framework containing only the settings and reusable sheet elements needed to create reliable drawings. In AutoCAD-based workflows, this starting file is commonly saved as a drawing template file. The same organizational principles also apply when a team uses a standard DWG as its starting point.
What an architectural CAD template should accomplish
The template should reduce setup work without forcing every project into an inflexible structure. Its main purpose is to make common drafting decisions predictable. When users create a layer, place a dimension, add a note, or prepare a sheet, they should not have to invent a new graphic system.
A practical template can establish:
- Drawing units and related insertion settings
- Architectural layer names and properties
- Text, dimension, multileader, and table styles
- Common linetypes and hatch definitions
- Layout and viewport conventions
- Page setup and plot-style relationships
- Title block locations or references
- Basic drawing metadata and reusable fields
- Quality-control notes for internal use
The template does not eliminate project-specific decisions. Drawing scale, sheet size, consultant requirements, local regulations, and office deliverables still need to be confirmed for each project.
Begin with a clean source file
Start from a new, trusted drawing rather than repurposing a completed project. Old project files often contain hidden layers, imported linetypes, anonymous blocks, unused styles, consultant data, and coordinate settings that do not belong in a general template.
Before adding office standards, verify the drawing units and insertion behavior. A template should support the measurement system used by the intended project group. If an office works in more than one unit system, separate templates are usually clearer than a single file that relies on users to change critical settings manually.
Keep the drawing origin available and avoid placing sample geometry far from it. A template should not establish arbitrary project coordinates. Survey control, shared origins, and real-world coordinates belong to the project setup process.
Build a controlled layer foundation
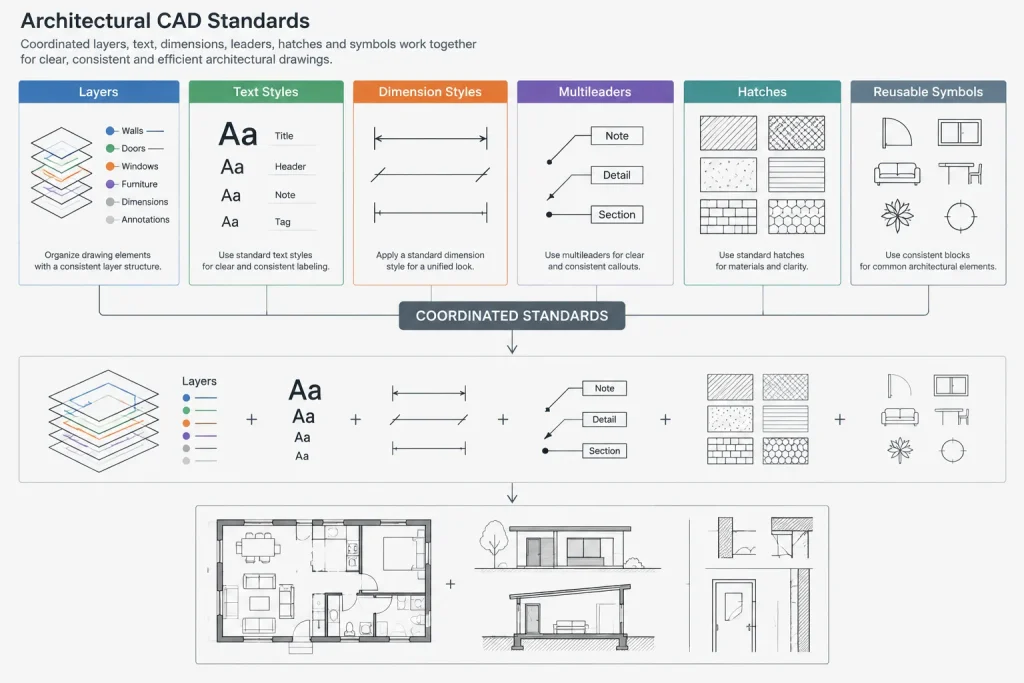
Include layers that are common enough to justify appearing in nearly every architectural file. Typical categories may cover walls, doors, windows, fixtures, furniture, annotation, dimensions, hatches, overhead elements, grids, reference information, and non-plotting construction graphics.
Each layer should have an intentional name, color, linetype, lineweight, and plot behavior. These properties must coordinate with the office plot system rather than being selected in isolation.
Avoid loading the template with every layer ever used by the office. An oversized layer list slows selection and encourages users to place objects on vaguely related layers. Specialized layers for demolition, interiors, site work, or presentation graphics can be introduced through discipline-specific templates or approved seed files.
Questions to ask about every included layer
- Will this layer be used on most drawings created from the template?
- Is its purpose clear from its name?
- Does its lineweight support the intended graphic hierarchy?
- Does it need a special linetype?
- Should it plot, or is it only a drafting aid?
- Could its function be confused with another layer?
Coordinate annotation styles as a system
Text, dimensions, leaders, and tables should look related. They do not need identical settings, but they should share a deliberate typographic and graphic hierarchy. For example, general notes, view titles, room labels, and detail annotations may require different emphasis while still belonging to the same drawing set.
Create only the styles the office actively uses. Give each style a descriptive name that indicates its role rather than relying on generic labels. Confirm font availability before distributing the template; a missing font can alter text width, wrapping, and sheet composition.
Dimension styles require particular care. Check text placement, extension lines, terminators, unit display, precision, and scaling behavior against the office drawing workflow. A style that looks correct in one test file may fail when used in a different viewport or annotation method.
Multileader and table styles should also be tested with realistic content. Long notes, stacked fractions, wrapped schedule cells, and crowded callouts often expose problems that are not visible in a simple sample.
Decide what belongs in model space
In most cases, model space in a general architectural template should remain nearly empty. Project geometry, room layouts, consultant backgrounds, and site information should not be embedded in a reusable template.
A limited amount of instructional content may be helpful, but it should not be positioned where it can accidentally plot or become part of a project model. Internal guidance can instead be placed on a clearly identified non-plotting layer, stored in a separate standards drawing, or documented outside the CAD file.
If the office uses standard north arrows, section markers, elevation symbols, or other annotation blocks, consider whether they truly belong in the template. Frequently revised content is often easier to control in a block library or tool palette rather than duplicating it inside every new drawing.
Set up paper-space layouts deliberately
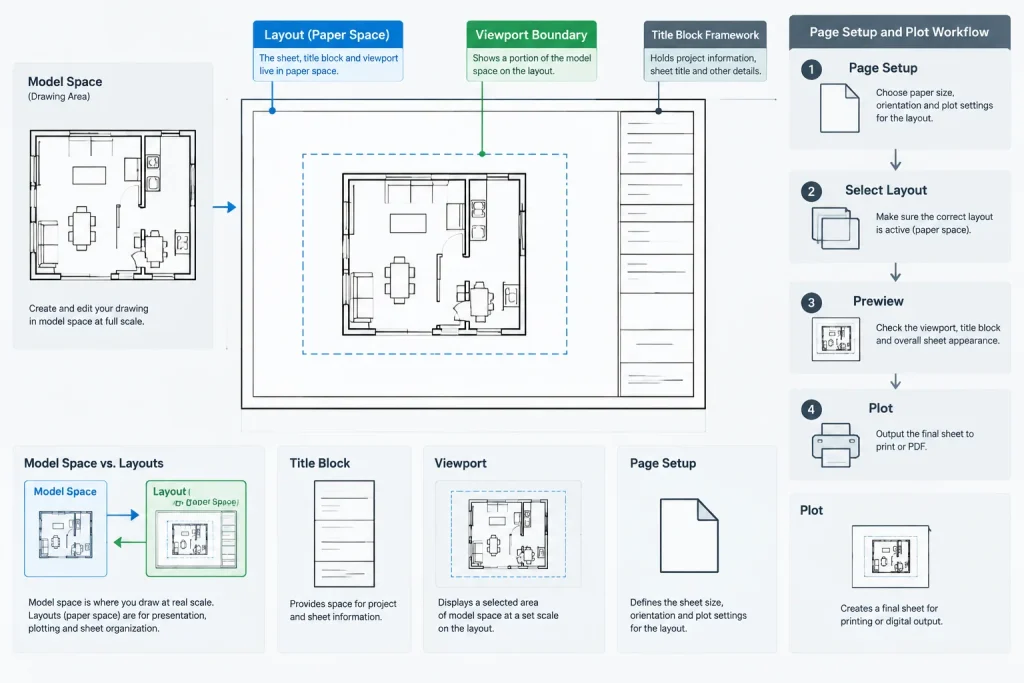
Layouts can save substantial setup time when they reflect actual sheet-production practices. A layout may include a viewport layer structure, a title block framework, expected margins, and a named page setup. However, each item must remain adaptable to the project’s sheet format and output method.
Title blocks can be embedded, inserted as blocks, or referenced from a controlled external file. Referencing can make office-wide updates easier, while embedded blocks may be more portable. The right choice depends on how the team packages files, shares drawings, and archives issued sets.
Do not leave active viewports at arbitrary scales or with unintended layer overrides. If a viewport is included as a placeholder, label its purpose and check its properties before approving the template.
Coordinate page setups and plot styles
A template can contain named page setups for common output conditions, but those setups must match available plotters, PDF workflows, paper sizes, and plot-style files. A page setup that points to an unavailable device creates confusion rather than saving time.
Plot test the template using the same method that will be used for project issues. Review lineweight contrast, screened information, hatch density, text clarity, viewport boundaries, and title block alignment. Both full-size and reduced output should remain legible if the office routinely uses both.
| Template component | Primary check | Common problem |
|---|---|---|
| Layers | Naming and graphic hierarchy | Duplicate or ambiguous purposes |
| Text styles | Font availability and readability | Substitution changes text width |
| Dimension styles | Units, placement, and scaling | Inconsistent appearance between views |
| Layouts | Sheet composition and viewport behavior | Leftover overrides or incorrect scale |
| Page setups | Output device and plot area | Unavailable printer configuration |
| Title blocks | Attributes, fields, and revision workflow | Project data copied into new files |
Remove project-specific and hidden content
Before publishing the template, inspect it for information that should not be reused. This includes client names, addresses, project numbers, revision records, issue dates, consultant references, drawing-index data, and custom properties inherited from another job.
Clean unused blocks, layers, styles, registered applications, and other residual definitions when it is safe to do so. Review external references and image attachments to confirm that the template does not depend on files stored in a project folder. Also inspect drawing properties and title block attributes that may not be immediately visible on screen.
Test the template through a real drafting exercise
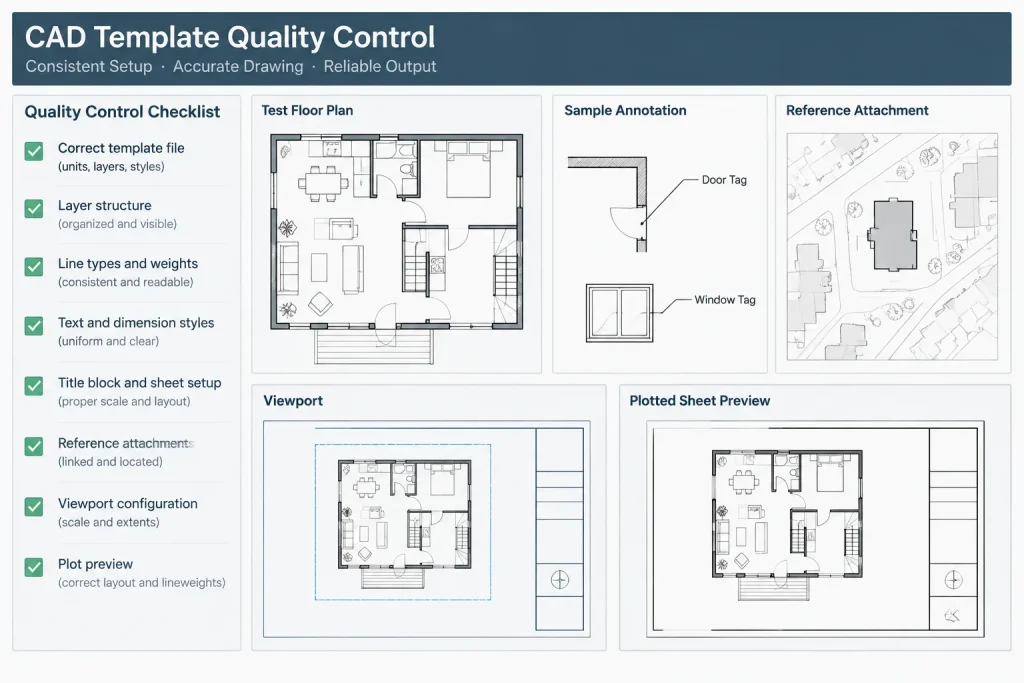
A template should be tested by producing a small representative drawing rather than merely opening and saving it. Draw walls and openings, place dimensions, add notes, create a viewport, attach a reference file, and plot a sample sheet. This reveals conflicts between settings that appear correct when reviewed separately.
Ask another CAD user to perform the test without verbal instructions. If that user cannot understand a layer name, select the intended annotation style, or create a clean sheet, the template may depend too heavily on undocumented knowledge.
Maintain separate template levels when needed
One template rarely serves every purpose equally well. A compact office base template can hold shared layers and styles, while project-type templates can add layouts or content for specific drawing packages. This approach keeps the core standard stable without overloading every new file.
Possible template levels include:
- A general model-file template
- A sheet-file template
- A presentation or diagram template
- Discipline-specific architectural templates
- Templates for different unit systems or delivery requirements
The distinction between them should be documented so users know which starting point to select.
Control revisions to the template
Treat the template as a managed office resource. Assign responsibility for reviewing requested changes, testing them, and publishing the approved file. If every user edits a private copy, drawings will gradually diverge even when they appear to follow the same standard.
Record what changed and why. When a revised template is released, explain whether the update affects only new drawings or should also be applied to active projects. Avoid forcing mid-project changes unless the benefit outweighs the risk of disrupting issued graphics.
Final template review checklist
- Confirm units and insertion settings.
- Review layer names, properties, and plot behavior.
- Test text, dimensions, leaders, tables, and annotation blocks.
- Inspect layouts, viewports, title blocks, and page setups.
- Verify that required fonts, linetypes, and plot styles are available.
- Remove project-specific metadata and unused definitions.
- Check for unintended references, images, and file dependencies.
- Create and plot a representative test drawing.
- Store the approved template in a controlled location.
- Document ownership and the process for future updates.
A successful architectural CAD template is intentionally modest. It standardizes recurring decisions, supports clear plotting, and helps users begin work confidently without carrying unnecessary content from one project to the next. Regular testing and controlled maintenance are more valuable than filling the file with every possible layer, block, or layout.
Turn the template into a dependable office resource
The technical setup is only part of template management. A reliable template also needs a clear owner, a controlled publishing location, and a review process. Without those controls, users may create local copies, rename styles, replace title blocks, or retain outdated plotting settings. The resulting files can look similar while behaving differently.
Separate standards from project content
A useful way to evaluate proposed additions is to ask whether the item represents a recurring office decision or a temporary project condition. Shared annotation styles and approved layer properties may belong in the template. Client information, consultant references, survey coordinates, and job-specific layouts generally belong in project setup.
This distinction also helps determine where reusable content should live. Stable sheet elements may be appropriate for a template, while frequently revised symbols and blocks may be easier to manage in a controlled library. The goal is to avoid duplicating content that must later be corrected in many separate files.
Document the reason behind important settings
Names alone do not always explain why a layer is non-plotting, why a particular page setup exists, or which annotation style should be used in a given context. Maintain a short standards note or change record that explains the intended workflow. This makes future review easier and reduces dependence on knowledge held by a single CAD manager.
Validate the complete drawing path
Template quality should be judged by the finished output, not only by how organized the file appears. Follow a representative workflow from new drawing creation through modeling, annotation, reference attachment, sheet composition, and plotting. Check whether users can make appropriate choices without repairing defaults or searching through unnecessary styles.
When a problem appears, trace it back through the system. Weak line hierarchy may involve layer properties, object overrides, viewport overrides, or plot-style behavior. Misaligned title information may involve attributes, fields, references, or layout settings. Reviewing these relationships is more effective than changing the first visible setting.
Release updates with context
When the approved template changes, tell users what was modified, why it changed, and where the current file is stored. Clarify whether the revision is intended only for new drawings or whether selected settings should be introduced into active work. This prevents an apparently minor standards update from creating inconsistent sheets within an established drawing set.
A lean, well-governed template is easier to trust than a large file with unclear history. Keep the baseline focused, test it through actual production tasks, and add content only when it provides a repeatable benefit.
Architectural CAD template questions
Is a CAD template the same as a completed sample project?
No. A template is a controlled starting framework for reusable settings and sheet elements. A completed project is likely to contain job-specific geometry, coordinates, metadata, references, styles, and other content that should not carry into unrelated work.
Should every office layer be included in the template?
Only layers that support the template’s intended drawing workflow should be included. Specialized layers can be supplied through project-type templates or other approved resources. A focused layer list is easier to understand and reduces ambiguous object placement.
Should standard CAD blocks be stored inside the template?
Some stable annotation or sheet elements may belong there, but frequently revised blocks are often easier to control through a managed library or tool source. Consider how often the content changes and whether duplicated definitions would become difficult to update.
Can a template include title blocks and layouts?
Yes, provided they reflect the team’s sheet-production process and remain adaptable to project requirements. Title blocks may be embedded, inserted, or externally referenced. The chosen method should suit file sharing, packaging, updating, and archiving practices.
Why should another CAD user test the template?
An independent user can expose unclear names, undocumented assumptions, missing resources, and awkward workflows that the template author may overlook. The test should include actual drafting, annotation, viewport setup, reference attachment, and output review.
Should a revised template be applied to active projects?
Not automatically. The team should compare the benefit of the change with the risk of altering established graphics or issued documents. Template updates may be limited to new work unless an active project has a clear reason and controlled method for adopting them.